Wednesday, January 30, 2013

Bright Lights Big City

Happy hump day my friends! We are almost to the weekend! Hopefully everyone has something to look forward to, and if nothing else at least there is that whole sleeping in thing. So today's polish is probably what I would call a glitter bomb. And if you're feeling a little worn out about your week, this bling in this will DEFINITELY perk you up! I started with a blue base with I made using TKB's Glamour base and adding a few drops (seriously, just drops) of TKB's blue jellie base. I then followed up by adding two scoops each of TKB's Headtrip Glitter, TKB's Pink Points Glitter, and Glitter Mix Boutique's .40 matte turquoise hex glitter. The results reminded me of flying in a plane and looking down and seeing the crazy amount of lights that shine from a big city. So, Bright Lights Big City was born

   
Here is a full hand swatch shown with one coat on my pinkie finger and two coats on the remaining three; natural light
Here is a close up with flash and you can start to see the complexity of the polish. I think the addition of the matte hex helps it from being too predictable

Here is the macro shot which better shows both the pink and light blue metallic glitter as well as the turquoise matte hexes. So pretty!

I think this polish took about 2 coats of a standard quick dry top coat to get completely smooth so it wasn't too bad considering how jam packed with glitter this beauty is. It was surprisingly easy to work with if you did some thickish coats and opacity was definitely not a problem for me.  Well that's it for today polish, see you back next time! And I'm sure you always are, but keep it classy and creative!

Today's Franken Supplies Came From:

TKB Glamour base, blue jellie base, Headtrip glitter, and Pink Points glitter: TKB Trading
Matte Turquoise Hex Glitter: Glitter Mix Boutique


Monday, January 28, 2013

Dark Passenger


Welcome back my lovelies! I hope you had a wonderful weekend. Mine was spent playing some serious catch up on one of my favorite shows, Dexter. If you haven't seen it yet go watch it... right now... seriously, I'll wait. You'll thank me for this. Well in honor of the show I created a polish which I think kind of conveys the complexity of who Dexter is as a person. I call it, Dark Passenger. The dark base signifies Dexter's dark secret while the glitter throughout also highlights Dexter's than dark qualities, his love for his family and empathy for others. This polish was created by using TKB's Luster base as well as any black cream polish added drop by drop to desired opacity up to the bottle's halfway point. The remainder of the bottle was split evenly between Essie Luxe Effects Set in Stones and Wet 'n' Wild Fast Dry in The Gold & The Beautiful


Here is the polish in natural daylight. Pinkie finger shows 1 coat, the ring finger shows 2, the middle finger shows 3, and the pointer finger shows 4
Here we have the macro shot. Because the majority of the base is Luster Base, it gives the polish a great jelly finish which helps add to the complexity as you can see the glitters peeking out from the different coats.
Overall I was very please with the polish. It is not entirely smooth but its nothing top coat can't handle. We all know I dig Dexter, but I also totally dig this polish. Well that's all for today's franken, looking forward to some more lovelies later in the week. Hope to see you back! As always, keep it classy and creative


Today's Supplies came from: 
Luster Base: TKB Trading
Black Cream: any drugstore
Essie Set in Stones: Target
Wet 'n' Wild The Gold & The Beautiful: Kmart

Friday, January 25, 2013

Randommmmm!


Good morning ladies! Today's post will be a random one. I very quickly and unexpectedly sold my car this week and therefore was on a hunt for a new one. Ultimately this led to a few road trips before finally ending up in Orlando yesterday to buy a 2013 Subaru Forester. Honestly, I'm obsessed with it. Even thinking of trying to create a franken to match the paint, lol. Crazy? Don't care! Long story short, I'm a little behind on swatching and editing photos but I fully intend to catch back up over the weekend

However, the good thing about this is it gives me the chance to talk a little bit about something I probably should have addressed earlier; color adjusting. I was talking to some ladies on Makeup Alley who asked not so much about frankening itself but adjusting the colors of their existing polishes (i.e. making them warmer or cooler). So I realized that this might be a good topic to cover with you today. In order to best color adjust any nail polish product, it definitely helps to look at a color wheel. You are best off tweaking your colors with what is called, analogous colors, or colors that are closest on the color to the color you want to change. If you move too far from that spectrum, you will most likely end up with a different color altogether or a weird nasty color that you didn't intend for in the beginning. Given that reds/purples, and yellows/greens can straddle both sides of the warm and cool spectrum, those will most likely be the easiest to tweak without having to completely change the base color.

Keep in mind that warm colors are yellows, reds, oranges, red-based purples, browns, yellowish greens, etc. while cool colors are blue based purples/pinks, blues, blue based greens, etc. So if you want to color adjust a a green that is too cool for example, you would want to opt to adjust with yellows or other yellowish green hues. The same applies for warm to cool (but opposite of course !).


So anywho, hope that helps a little bit! You can be sure that I will be back on Monday raring to go with more franken posts. Have a wonderful weekend and don't forget to always keep it classy and creative!

Wednesday, January 23, 2013

Raspberry Crush

Hello ladies, today we have yet another happy accident of a franken. I was going for a deep ruby red-ish type of holo but turns out that adding the holo changes the base color. Bah, kinda sucks but either way I was still happy with it. This franken consisted if about 7/8 of a bottle of glamour base and the remainder being TKB red jellie base. Now with holos you do have to be careful not to overcolor your base, in doing that it makes it harder for the holo to show through. After adding the red jellie I then added two scoops of Spectraflair pigment and this turned the bright red base into a dusty raspberry colored base. Thus Raspberry Crush was born

Here is a picture in daylight to show you the dusty red/raspberry base color

And now we have the flash picture to show you how the holo comes out to play in the right lighting

And finally, we have a blurred pick to show you the linear of the holo

I think I've realized that it doesn't really matter how badly I may jack up a base color if you add Spectraflair or any other holo glitter, it instantly makes it magical. So overall, I was pretty happy with it. And even better, if you have a very careful hand (which I do not), you can actually get by with just one coat of this. I have done two for the pictures above. Now, I do understand that Spectraflair is nearly impossible to get your hands on but I have seen around the interwebs a couple of glitters that are supposed to be as good as Spectraflair. However, TKB's Luminosity glitter may be a good stand in but it will provide a more scattered holo effect rather than a linear effect.

So that's it for Raspberry Crush, looking forward to seeing you back next week for another fabulous franken! Thanks for stopping by and remember to always keep it classy and creative! 

Today's Ingredients came from: 
Spectraflair pigment: Ecrater
Red Jellie Base and Glamour Base TKB Trading 


Monday, January 21, 2013

Misty Morning

Welcome to yet another post here at Franken Femme! I am so glad you are here! Today's post is the brain child of a friend of mine named Alana and she asked me to create a gray polish with shimmer. Now I knew that was definitely doable but I also wanted to make sure that I created something unique for her so she could be proud to show my handiwork on her nails. That being said, today's polish started with a base of TKB Luster. I then added alternating drops of black and white Wet 'n' Wild cream polish. I'm not sure EXACTLY how many I used but I do know that I used a little bit more white than black. HOWEVER, make sure if you make this that you do not go too heavy on the alternating black and white polish as it will end up making the overall base too opaque to show the remainder of the glitter inside! After I got my desired shade, I followed it up by adding 3 large scoops of YouMix Magic Hex glitter and one good scoop of TKB Noble Sparks. Once this is all combined together, what came out is this awesome dusty grey that shimmers from the inside thanks to the glitter and the sparks. I decided to call it Misty Morning


This bottle shot really shows how awesome the glitter looks peeking out of the gray base


Macro bottle shot


Swatch. I like how the gray is predominant but you can definitely see the glitter showing through


And macro nail shot to try and show you that you really CAN see it close up

This polish was fully opaque in two coats and much to my surprise, not too bumpy. Its definitely nothing that one coat of top coat can't fix. I also like that the base is just gray, it doesn't lean taupe, or green, or purple, or any other color that grays typically lean. However, should you choose to make this, it can definitely be customized to make the gray lean more to a different base color. Well that's it for this polish, hope you enjoyed it! Can't wait for the next post and as always, remember to keep it classy and creative!

Today's supplies came from:
TKB glamour base and Noble sparks: TKB Trading 
Wet 'n' Wild White and Black Cream polishes: pretty much any drugstore, Walmart, or Target
Magic Hex Glitter: You Mix Glitter

Friday, January 18, 2013

Glacial

Happy Friday! Huzzah! I don't know about you guys, but for me, it has been a LONG week. I am definitely ready for a glass of wine... or four, but who's counting ;^) Well today we have a polish that was actually pretty difficult to photograph, which is kind of a bummer because that means that you guys can't fully appreciate the awesomeness (unless you make your own of course!). There is no real rhyme or reason as to why I made this polish but either way, I'm diggin it! Today's polish is a blue jelly which is made up of TKB's Glamour base and TKB's blue jelly base. Now with the blue jelly base, a little bit goes a LONG way so I filled the bottle up MAYBE 1/5 of the way. Other than that I added 3 scoops of TKB Aqua Sparks and 1 scoop of TKB Luminosity glitter. Put in the 2 agitator beads, shake what your mama gave ya, and you come up with this


Here is a bottle shot with flash to show you the aqua shimmer, that is, if you can manage to see it around my beastly finger prints (oops!)


Here is the bottle shot without flash to show you the very scattered holo (look ma, no finger prints!)


I like the squishiness of the jelly and the fact that it let's the shimmer shine through. My pointer finger has one coat of Glacial over Wet 'n' Wild black cream


Here is a macro of both fingers. I do kinda like how the black undies help to showcase the complexity of the shimmers

Unlike alot of my frankens thus far, Glacial took 3 coats to be completely opaque and it was kind of patchy on the first coat. But that was evened out easily by the next couple coats. It dried to a smooth finish but swatch pictures do have a coat of Sally Hansen Insta-dry. By the way, please forgive the ridonkulous status of my cuticles and such in these photos, I've been having an epic showdown with my nails lately. So that's all for today. If by chance you do make any of the frankens I showcase in my blog, I would LOVE it if you would send me a mani pic! Please feel free to send it to rlm04h@gmail.com. I hope to see you back soon and remember to always keep it classy and creative :)

Today's Supplies Came From:
All of today's supplies came from TKB Trading


Wednesday, January 16, 2013

Mannequin Hands

Welcome back ladies, so glad you are here! Today I made another matte franken to show you. Unlike alot of polish people who dislike mannequin hands ( where your nails are the same color as your skin and its hard to tell them from your hands) but I actually wanted to TRY and make a polish that could almost replicate that but maybe with a little flair? This polish was mostly a base of Hard Candy Matte-ly In Love however, I did add a few drops of white nail polish and a few drops of an unnamed dark brown Color Club cream polish I picked up from a Ross set. To this, I added a few scoops of TKB Copper Sparks to help give the polish a little bit of dimension. Now, if I was smart, I would have left well enough alone right there. But I'm not, so I decided to add LITERALLY 2 drops of Essie Ladylike that I received in a Birchbox a couple months back and it definitely turned this polish into more of a mauve than a nude colored polish. But I kinda still think it might be walking a fine line between a nude and a mauve, what do you think? Either way, I decided to stick with the name Mannequin Hands and here it is:


Here is the bottle shot. It shows all of the gorgeous copper shimmer up in there


Can you see it? The almost mauve tone that Lady Like added?


And finally, that would be my thumb nub with one coat of Sally Hansen Insta-Dry to show you the polish, unmattified. I like it that way too!

I've decided that I like the polish despite the accidental mauve, it keeps it office friendly while the matte and the shimmer still keep it interesting.  As with all mattes, this dried rather fast so if you go over the polish twice, you run the risk of clumping it up. Also, base coats/ridge fillers are your friends with mattes, as they will show every imperfection like its their job. Well that's all for this polish, hope to see you back soon for more franken recipes. As always, keep it classy and creative!

Today's Ingredients Came From:
Hard Candy Matte-ly In Love: Walmart
Dark Brown Color Club Cream: Ross
Essie Lady Like: I got mine from Birchbox but the Essie website is a good resource
White Cream: Walmart
Copper Sparks: TKB Trading

Monday, January 14, 2013

Holo AND Flakies??!!

Well hello my lovelies! I hope you've had a wonderful weekend! I'm getting ready to sell my car soon and I'm kind of nervous because I'm not too sure how difficult the process actually is,  so I've been washing, waxing, and scrubbing to get the car ready to show; wish me luck! Anyways, today I have another super simple and super awesome franken for today's post. Now I'm going to be honest, I'm completely stumped on the name because, let's be honest, I'm CLEARLY not as creative at naming polishes as I am at making them. Yeesh. So, if you have any ideas on possible names I'd love to hear them! Seriously... help... lol.

Todays franken only has 2 ingredients and was created on a particular day where I couldn't decide which of two certain polishes I'd rather wear. That being said, I combined half Essie Shine of the Times and half China Glaze Fairy Dust. Put them together, get a little shake action going on, and you have this awesomesauce right here:
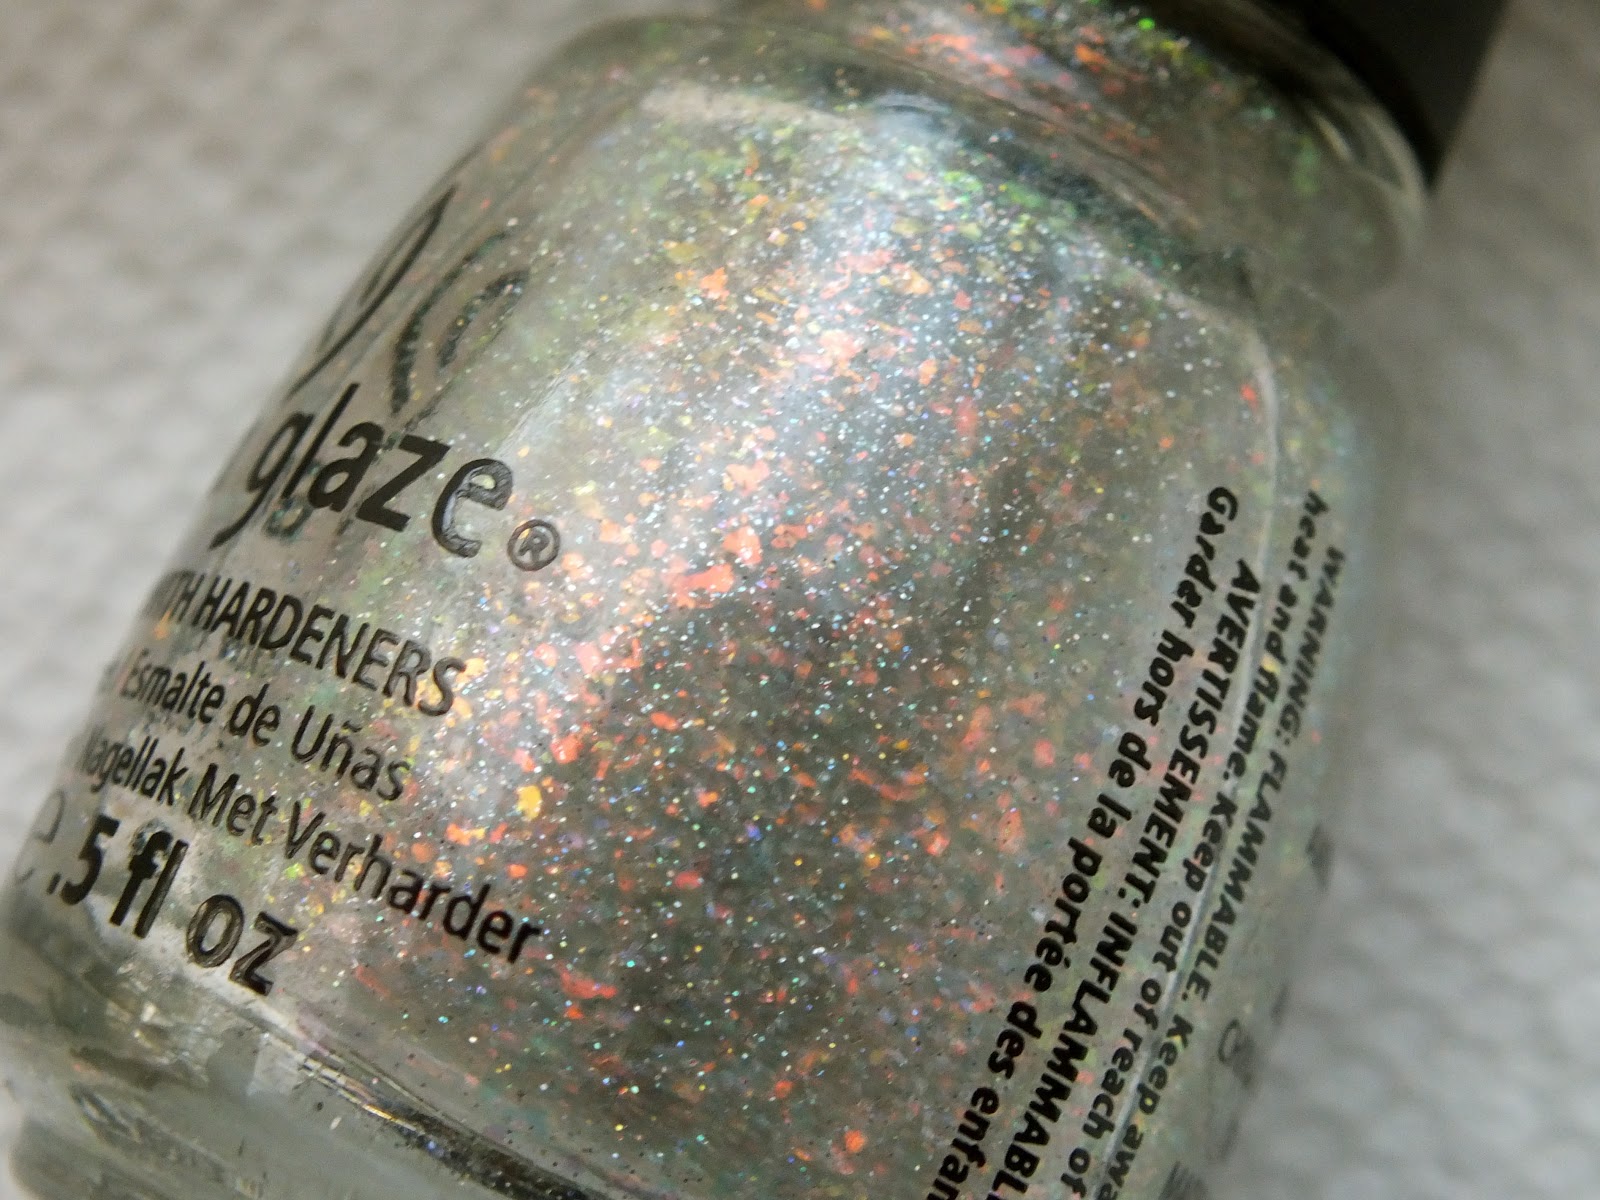
Sweet macro shot!


Here this shot shows two coat over bare nail on the index finger (and you can still DEFINITELY see VNL), one coat over Wet 'n' Wild Black Cream, one coat over China Glaze Peachy Keen, and one coat over Essie Adore-a-Ball. My cuticles and such are a MESS, trust me, I know. Ugh


And lastly, the bottle shot. I made this polish in what I had left of my China Glaze Fairy Gust, that's why it stayed in the China Glaze bottle.

Now, what I liked about this polish was that no matter what, it was always interesting. In the sunlight the holo came out to play and it sparkled like crazy. While in the shade, the flakies shifted from orange-red to green to gold. Like I said, awesomesauce. Ha! Given that this polish was made by two reputable companies, the polished flowed evenly, self leveled, and had normal dry time.  So simple, yet so awesome! Well that its for today my lovelies, looking forward to seeing you back for our next franken creation. See you back next time and as always, remember to stay classy and creative!

Todays supplies came frome:
ChG Fairy Dust: Sally Beauty Supply
Essie Shine of the Times: CVS 


Friday, January 11, 2013

Redheaded Step Child

You know that title made you just a little bit curious! My best friend is a Speech & Language Pathologist down in South Florida and I made this polish as part of her Christmas gift last year. Being that she's a redhead, I decided to call this polish Red Headed Step Child as opposed to its other R-rated alcoholic potential polish name, ahem. So this was created by making a jelly base using China Glaze Scarlet and TKB Luster Base. Then I added Glitter Mix Boutique Magic Hex MIx (At least 5 scoops) and TKB's red flakies (at least 4 scoops). As usual, you add a couple agitator balls, harlem shake that thing, then check out your final product; you're very own Redheaded Step Child:


I love the shiny squishy base that Scarlet made when combined with the Luster Base and it was translucent enough to allow the flakies and the glitter to show through, but still remained surprisingly smooth when dry. The polish was opaque at two coats and leveled well despite what was in the polish. Please note, even though I usually make my frankens as minis, this polish was made in full size since I gave it away as a gift. Well that's it for this beauty, hope you are as excited to see what I have in store as I am to show it to you!

And as always, remember to keep it classy and creative!

Today's ingredients came from: China Glaze Scarlet from my local Sally Beauty Supply, Luster Base and Red Flakies from TKB Trading, and Magic Hex Mix Glitter from You Mix Glitter

Wednesday, January 9, 2013

From Cosmic Checkers to Comets!

Today's franken is probably one of the most simple and freakin awesome frankens I've made. Now the complexity of this is going to blow your mind, ready? When you mix together Orly Space Cadet and add a few scoops of TKB Luminosity glitter, you get this bad ass right here, and I call it comet!


Now I tried beastly hard to try and take a good picture that captures the copper, pink, purple, and green multichrome while still also showing the holo, but this was pretty much all I got. However, I did notice that I might have stumbled upon a pretty close dupe for the now discontinued Dollish Polish Toxic Avenger which is pretty awesome if you missed that boat and are still lemming pretty hard. Athankyouverymuch! This polish was fully opaque in two coats and smooth, dry time was average. Hey it might have even inspired me to see if I can rock anymore duochrome holos. We shall see! That's it for today, keeping it short and sweet!  Remember, as always, to keep it classy and creative!

Today's ingredients were: TKB Luminosity glitter from TKB Trading and Orly Space Cadet that I bought from a local Ulta

Monday, January 7, 2013

As a matte-er of fact!

Hi ladies! I hope you've had a wonderful weekend. Today's polish turned out to be a happy little accident I created a little while back. I recently found out that you can create matte polishes by just using matte topcoat. They are pretty awesome for suspension use too! So I was trying to create a duochrome matte polish using the TKB matte pigments and instead I ended up with this bad boy, which I like to call Earthbound:

Check out the sweet bottle shot! The duochrome definitely showed up in the bottle, can you see the blue around the edges?


Here is a closer shot to try and show you some of the shimmer

This polish was made by using the Hard Candy matte top coat, a few drops of TKB matte black base, TKB Travel to Earth pigment (3 scoops), and one scoop each of TKB's aqua and purple sparks.  Add of course, 2 agitator balls and shake! This polish is pretty cool because depending on the lighting, sometimes its gray and sometimes its a dark green but it always retained the small shimmer from the sparks that made it more complex than just a standard matte. Now while I WAS going for a duochrome finish, I was still pretty happy with what I ended up creating. Now being a matte, this polish did dry very fast and can end up clumpy if you don't apply it carefully. Also, its best to use a good thick base coat or ridge filler with something like this as the matte tends to amplify any nail imperfections, plus it helps with tip wear and chips! It was totally opaque in two coats. Next up, I found something on Pinterest that told me that I could make my own matte topcoat by mixing cornstarch in with clear coat. I'm pretty stoked to try this out and see if it will work, or create some weird doughy polish nonsense. I will report back as soon as I find out! Well, that's all for now, but I look forward to seeing you guys back next time with our new franken creation!

Todays supplies can be found at the following: Franken bottle, agitator beads, aqua/purple Sparks!, Travel to Earth pigment (shifts between blue and green), and matte black basecoat: TKB Trading and Hard Candy Matte-ly in Love top coat: Walmart

Friday, January 4, 2013

Toxic Moss

After I FINALLY figured out the name to this polish, I realized that it's pretty similar to Cult Nails' name for one of their polishes, Toxic Seaweed. The polishes are pretty different form each other though. So Polish Naming Writer's Block-1, lame uncreative polish naming me-0. Boo. Well anyways, today I have another holo franken and I actually remember what goes into this!. What I've found out from making the past couple polishes is I've probably been wasting way more Spectraflair pigment than I needed to as I did not thin down the base color. Ultimately, this made the polish more opaque requiring the use of more Spectraflair to actually have it show up. If I could do it again I would most likely thin the base green color with some suspension base to allow the Spectraflair to show up better. With the being said, today's polish is an olive green with muted gold shimmer and linear holo. I used Finger Paints Tough Art to Follow, one scoop MAC Old Gold Pigment, and at least two scoops of Spectraflair. After some mixing balls and alot of shaking, Toxic Moss was born!


The last shot of the bottle is intentionally blurred to show off the sweet linear holo-ness. The polish flowed evenly across the nail, self leveled well, was not streaky or patchy, and fully opaque in two coats. Great success!! Well that's it for today, I've got my franken juices flowing and look forward to creating some new pretties for you in the near future! 

Until next time my lovelies, stay classy and creative!

Today's supplies were: Frankenpolish bottles and mixing balls found at TKB Trading, MAC Old Gold Pigment found at Dillard's, Finger Paints Tough Art to Follow found at Sally Beauty Supply, and Spectraflair pigment found on Ecrater.

Wednesday, January 2, 2013

Dreamcatcher

Today I have a franken that I made FOREVER ago, literally. So please please forgive me because I do not remember what exactly went into making this polish. I do know that I added Spectraflair pigment and I am pretty sure that the base consisted largely of OPI's What's With the Catitude. But I'm not sure exactly what else I put in there to give the polish the more dusty quality that it has. This polish is opaque in two coats and is a tad bit on the thick side, but that could be because the polish is so old. I liked that the polish is nice and muted in the shade but when you get the polish in the sun, it's like a rainbow from the mild linear holo. Love!
Here is Dreamcatcher:


Sorry I can't tell you a little more about what goes into this polish, but I still thought it was too beautiful not to share. Next time, I promise to provide more detail into my polish recipe! Well that's it for this post, remember, if there is anything you want to see, feel free to shoot me a suggestion. I'd love to hear from you!

 As always, remember to sty classy and creative!

Related Posts Plugin for WordPress, Blogger...